 |
|
|
|
•
Wallpaper
Tools you'll need:
•
Scaffold |
 |
|
papering
a ceiling...
|
||
|
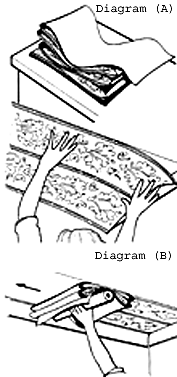
Wallpapering a ceiling is an effective decorating technique, and sometimes the best way to disguise a badly cracked or uneven ceiling. Do the ceiling before you do the walls. First, prepare the ceiling surface as for a wall, filling any holes or cracks and applying a coat of sizing. So you don't have to handle longer strips of paper than necessary, work crosswise across the width of the room rather than lengthwise. Draw a straight line along the ceiling about 2cm less than the width of the roll and mark with chalk. Place the first strip against this line and butt each succeeding strip against the one before. Cut and paste as for papering a wall but fold the paper concertina style as illustrated in Diagram (A), paste against paste. If using pre-pasted wallpaper roll the dry strip with the top in, immerse in trough of water and re-roll onto a spindle such as a piece of broomstick. Let the excess water drain off and start strip along chalk line as for pasted paper. Brush the paper into position against the chalk line, a short length at a time. Start at the right hand corner of the room if you are right handed and unfold about a metre of paper at a time, smoothing it down with your hand or a wallpaper brush while you support the rest of the folds in your other hand. See Diagram (B). All this suggests you will need a firm base to work on, and the best possible surface is a scaffold that allows you to go all the way across the room without climbing up and down a ladder. After unfolding and smoothing a complete strip of paper, go back to where you started and work out all the bubbles, smoothing carefully this time to get the desired final effect. When working around light fixtures, drop the fixture as far from the ceiling as possible, cut a slit in from the nearest edge of wallpaper, fit strip around fixture to match adjoining strips, and replace fixture when job is completed. |
||
|
©
2001 Pivot Web Design - www.geocities.com/pivotweb/ All Rights Reserved.
|
||
|
|
||